Ted's Tidbits
About Archive Photos Replies Reading Tweets Also on Micro.blog
  • Do Promises Make Your Code Better?

    In a post on GitHub, Dave Winer asks, “What do promises do/make possible that callbacks don’t?"

    This is a great question, and one, IMHO, that is not often addressed or answered well. It often seems that developers embrace new patterns and API, taking for granted that they are better simply because they are newer.

    This question brings me back to when I first had to work in a Promise-heavy codebase. It was five years ago, and I had very similar questions. The answers I got at the time weren’t very convincing. Here’s some sample code that uses the callback pattern:

    request.get('http://api.someurl.com/api/resource', function (error, data) {
      if (error) {
          console.error('An error happened', error);
      }
     
      console.log('Response received:', data);
    });
    

    Now, here’s the same code using the Promise pattern:

    request.get('http://api.someurl.com/api/resource').then(function (data) {
      console.log('Response received:', data);
    }).catch(function (error) {
      console.error('An error happened', error);
    });
    

    It’s different, but is it better? It really doesn’t seem to do anything that couldn’t be done with callbacks.

    Where Promises started to shine for me was when I needed to compose multiple asynchronous responses. I provided code examples on the GitHub thread.

    Dave replied with a link to some code he had written that had some pretty hairy logic involving many levels of nested callbacks.

    I decided to refactor this code to use Promises, and then provide it as an example for further discussion of whether the Promise code is better or not. Along the way, I decided to take it a step further and I used some async functions and generator functions. I recorded my screen while I was making this edits. The finished product is on GitHub, the video is below.

    Let me know what you think. Is this better or just different?

    → 10:01 AM, Jun 29
  • The Future of Javascript -- Who Cares?!?

    Yesterday on Slashdot, someone posted an InfoWorld interview of Brendan Eich (the creator of JavaScript).  In the interview he lays out his plans of the evolution of JavaScript into what he calls JS2.  The discussion on Slashdot was over the details of whether the language changes made things better or worse.  The thing about programmers is that they won’t all agree on anything.  Everyone has their own understanding of how software should be written.  My critique isn’t on any of the details of the language changes, its the premise itself.

    First of all, let me say that I don’t believe JavaScript to be the Holy Grail of languages.  It’s not perfect, there are things about it that I find irritating.  There are also things about it that I like.  This is true of any language with any competent hacker.

    Why JavaScript Matters:

    More and more software is being designed to run “in the cloud”.  The benefits are obvious.  Deployment is trivial, as are upgrades.  Developing for the web means not having to care about the users' platforms.  Connectivity is becoming faster and more ubiquitous every day.  JavaScript matters because it is the language of the web.  It excels not on technical merit, but out of necessity.

    In the 1990s, Netscape was in a unique position.  It essentially owned the web platform.  Whatever they decided became standard.  When Microsoft built IE, they had to include JavaScript support so their browser could compete.  Every new browser since then had to include a JavaScript engine.

    In todays market, every computer has a web browser and therefore has a JavaScript engine.  JavaScript matters for one reason, and only one reason: it is ubiquitous.

    Why JS2 Does Not Matter:

    Although Mozilla acts as if they inherited Netscape’s mid 90s status as keeper of the web platform, this is not the case.  They say that it doesn’t matter is Microsoft adopts JS2 or not, they’ll just write an IE plugin.  This may work to increase JS2 adoption, but it doesn’t actually solve any real problems.  JS2 is a solution looking for a problem.

    When building TileStack, my main problem with JS isn’t some language feature (native classes, typed variables, etc.) it’s the lack of consistency between browsers.  Granted this isn’t something the Mozilla Foundation can fix, but a new version of the JS language does more harm than good in this context. 

    Why JS2 is Harmful to Mozilla:

    While Mozilla has the best of their JavaScript team busy writing new language features, the competition is getting tough.  Apple continues to push the limits of WebKit.  The next version of Safari will smoke the competition when it comes to JS performance.  They are packing so much stuff into the browser, that web developers will start to question the need for Flash.  Meanwhile, Mozilla is working on the syntax for the “let” keyword.  Hey Mozilla, where’s mobile FireFox?  How come the poster boy for open source isn’t part of the first open source mobile phone platform (Android)?  Congratulations on all the downloads of FireFox 3.  Too bad it’s killer feature is that it doesn’t suck down resources like FireFox 2.  Wake up guys, you’re starting to lose!

    I guess the point is that language syntax is one of the least important features of a platform.  Do developers use .Net for C#’s syntax?  Is Objective-C’s syntax the reason for Apple’s recent successes?  Will the declarative structure of JavaFX Script save the Java platform?  I could go on with more examples, but I wont.  The answer is a resounding NO!  There are much more important things to ensuring the success of a platform than language syntax.

    I suppose this doesn’t really need to concern me.  The web as a platform will continue to exist and grow and mature.  It’s just frustrating to observe this waste of time and energy.

    UPDATE: I want to give credit where credit is due.  My colleague Josh Gertzen was quoted in AjaxWorld magazine on the irrelevancy of JS2 in an article that ran on Slashdot for a while.

    → 10:14 AM, Jun 24
  • ThinWire 1.2 Release Candidate 2 Available Now

    ThinWire, the framework that provided my acclaim in the technology space, has just announced Release Candidate 2 of version 1.2 with promises of a final release within the week. This is very exciting news for anyone that uses the framework. It continues to get better and better over time. Congratulations Josh!

    Download Link

    → 10:50 AM, Sep 17
  • Blatant and Shameless Book Promotion

    Yesterday at OSCon, Prentice Hall announced the launch of the Sourceforge Community Press.  It is a special line of eBooks (called Shortcuts) that feature open source projects and are written by the developers themselves.

    It is my pleasure to announce that one of the four titles available at launch is the ThinWire Handbook: A Guide to Creating Effective Ajax Applications, co-authored by yours truly.  It is available now for the price of $12.99 as a downloadable PDF, and it is also available through the Safari Bookshelf.

    In the book, Josh Gertzen and I provide an overview of the entire framework.  Our goal is to describe the essence of each piece that makes up the complete framework, as well as to document features that may not be obvious to most developers.  So, if you’re into that sort of thing, go pick up download a copy, and start learning the awesomeness that is ThinWire.

    → 9:55 AM, Jul 24
  • Creating and Debugging ThinWire Applications with Eclipse

    This tutorial will walk you through the creation of a simple Rich Internet Application with ThinWire using Eclipse 3.2 (Callisto) and the Eclipse Web Tools (WTP). It will also show you how to use these tools to debug your ThinWire application.

    NOTE: Neither Eclipse nor the WTP plugins are necessary for ThinWire development. There are also other methods of using Eclipse to debug your ThinWire application that don’t require the WTP, but this currently appears to be the most straight-forward approach.

    Configure the Development Environment

    To follow this tutorial, you must have Eclipse 3.2 and the WTP installed with Apache Tomcat installed and configured. Below is a quick summary of the steps necessary. For more information see http://www.eclipse.org/webtools/.

    1. Download and Install Eclipes 3.2 (Callisto) from http://www.eclipse.org/downloads/
    2. Load Eclipse, Help –> Software Updates –> Find and Install…
      1. New Features –> Callisto Discovery Site
        1. Check “Web Standard Tools (WST)” and “J2EE Standard Tools”
        2. Click “Select Required”
    3. Download & Extract Apache Tomcat from http://tomcat.apache.org/download-55.cgi
    4. In Eclipse, Window –> Preferences
      1. Server –> Installed Runtime Environments
        1. Click Add
        2. Choose Apache –> Apache Tomcat v5.5
        3. Click Next
        4. Set Tomcat Installation Directory to the location you extracted the Tomcat archive
        5. Click Finish
    5. Switch to the J2EE Perspective
    6. Window –> Show View –> Servers
      1. Right-Click –> New –> Sever
      2. Hostname = localhost
      3. Server Type = Apache –> Tomcat v5.5 Server
      4. Runtime = Apache Tomcat v5.5
      5. Click Finish

    Create a ThinWire Project

    Once you have Eclipse installed and configured, you can create your new project. Open Eclipse and switch to the J2EE Perspective. Then right-click on the Project Explorer and select New –> Project.

    tutorialdebugging1.png

    Choose Web –> Dynamic Web Project and click Next.

    tutorialdebugging2.png

    Set the project name to SimpleApp and make sure the Target Runtime is the Apache Tomcat that you set up in the configuration. Click Finish. Eclipse will create the project for you. If this is your first web project, you may have to accept a license agreement.

    tutorialdebugging3.png

    If you haven’t already done so, download the ThinWire SDK from http://www.thinwire.com/download.html. Extract the zip archive, and copy the tree JAR files from demos/playground/WEB-INF/lib (thinwire.jar, retroweaver-rt.jar, commons-fileupload-1.0.jar) to $ECLIPSE_WORKSPACE/SimpleApp/WebContent/WEB-INF/lib (where $ECLIPSE_WORKSPACE is the path of your Eclipse Workspace).

    tutorialdebugging4.png

    Back in Eclipse, right click on SimpleApp in the Project Explorer and choose Refresh. The three JAR files should now appear under Web App Libraries.
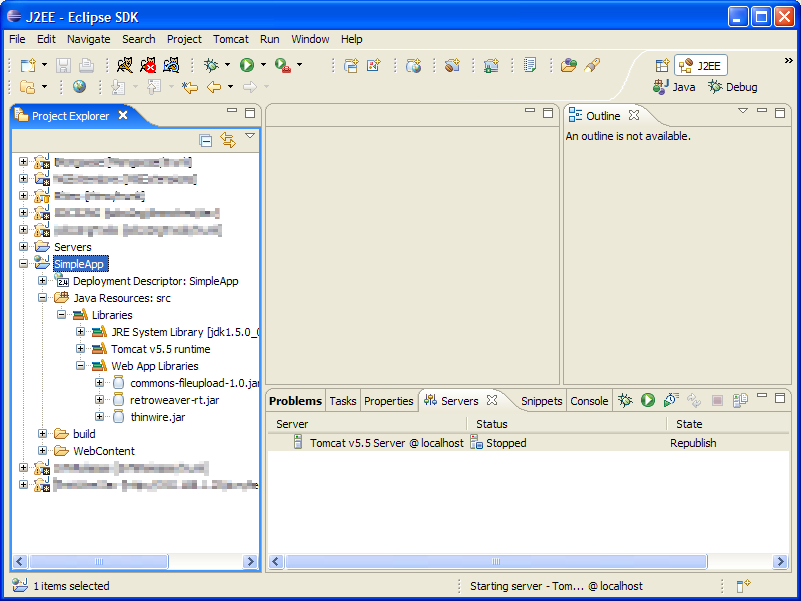
    tutorialdebugging5.png

    At this point you should have a Dynamic Web Application Project with the ThinWire Runtime and support libraries. Let’s write some code.

    Creating the ThinWire Application

    Right-click on Java Resources: src and choose New –> Package.

    tutorialdebugging6.png

    Make sure the Source folder points to SimpleApp/src and set the package name to thinwire.apps.simple. Click Finish. Right-click on the thinwire.apps.simple package and choose New –> Class.
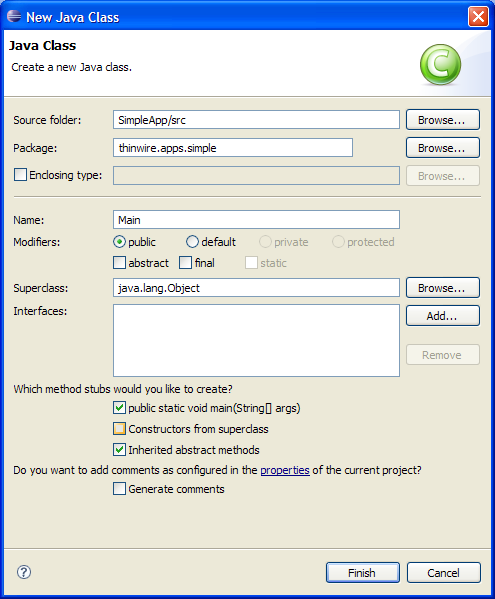
    tutorialdebugging7.png

    Make sure the Source folder and Package are correct. Call your new Class Main and check the box to create the public static void main(String[] args) method. Click Finish. Eclipse will generate the following java code in a file called Main.java:

    package thinwire.apps.simple;
    
    public class Main {
    
        /**  
        * @param args  
        */
    
        public static void main(String[] args) {
    
        // TODO Auto-generated method stub
    
        }
    }
    

    We’re going to create a simple application that presents the user with a Dialog asking for their name. When the user types their name anc clicks the OK button, the Dialog closes and another Dialog appears to greet the user by name.

    The first thing we need to do is import the ThinWire UI Package and the ThinWire Event Package:

    package thinwire.apps.simple;  
    import thinwire.ui.*;  
    import thinwire.ui.event.*;
    
    public class Main {  
    

    The thinwire.ui package contains the classes for all of the user interface components provided by thinwire. ThinWire contains over 20 components, but for this application will will be using only Divider, Label, TextField, Button, and MessageBox. The thinwire.ui.event package contains the event listeners for the UI components. In this application we will be using an ActionListener with a Button.

    The creation of a ThinWire web application is very straightforward and is very similar to creating a standard desktop application. Basically all we do is:

    1. Create new instances of Dialog, Label, TextField, and Button,
    2. Set the Text of the Label to somethin descriptive,
    3. Add an ActionListener to Button,
    4. Add the Label, TextField, and Button to the Dialog
    5. Display the Dialog

    The code looks like this:

    public static void main(String[] args) {  
        final Dialog dialog = new Dialog("Simple ThinWire Application");
        
        // The position of the Dialog is relative to the browser  
        dialog.setBounds(25, 25, 215, 210);  
        Label label = new Label("Hello, what is your name?");
        
        // The position of the Label is relative to the Dialog  
        label.setBounds(5, 5, 200, 25);
        
        // the Dialog and TextField are declared final so they can be  
        // refereced inside the Button's ActionListener  
        final TextField input = new TextField();  
        input.setBounds(5, 35, 200, 25);
        
        Button button = new Button("OK");  
        button.setBounds(55, 65, 100, 25);
        
        // When the button is clicked, close the dialog and greet the user  
        button.addActionListener(Button.ACTION_CLICK, new ActionListener() {  
            public void actionPerformed(ActionEvent ev) {  
                dialog.setVisible(false);  
                MessageBox.confirm("Hello " + input.getText() + "!");  
            }
            
        });
        
        dialog.getChildren().add(label);  
        dialog.getChildren().add(input);  
        dialog.getChildren().add(button);
        
        dialog.setVisible(true);  
    }  
    

    Once you have finished typing your code, save the file.

    Configuring the ThinWire WebServlet

    Now, we need to configure the web app. In the Project Explorer, expand the Deployment Descriptor tree element. Right-click on Servlets and choose New –> Servlet.

    tutorialdebugging8.png

    Check the box next to Use existing Servlet class. Click Browse and choose WebServlet. Click Next.

    tutorialdebugging9.png

    Add two Initialization Parameters:

    Param1 (the name of the class with the main method):

    name = mainClass
    
    value = thinwire.apps.simple.Main
    

    Param2:

    name = extraArguments
    
    value = initParam,clientInfo,header
    

    Select the only URL Mapping in the list, click Edit, and change it to “/” (without the quotes). Click Next.
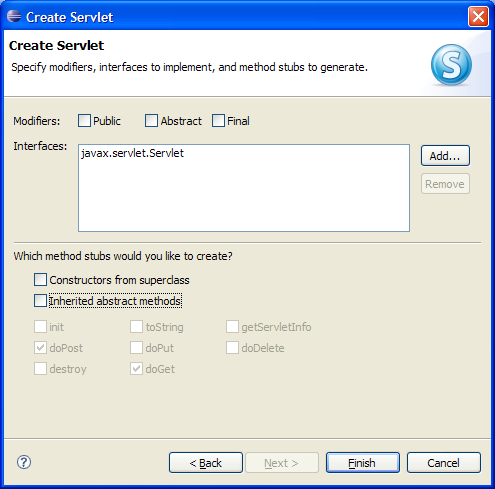
    tutorialdebugging10.png

    Uncheck all the boxes and click Finish.

    Eclipse then writes this configuration information to WebContent/WEB-INF/web.xml. Your servlet is configured. Let’s run the app.

    Run the Application

    Right-click on SimpleApp in the Project Explorer and choose Run as –> Run on Server
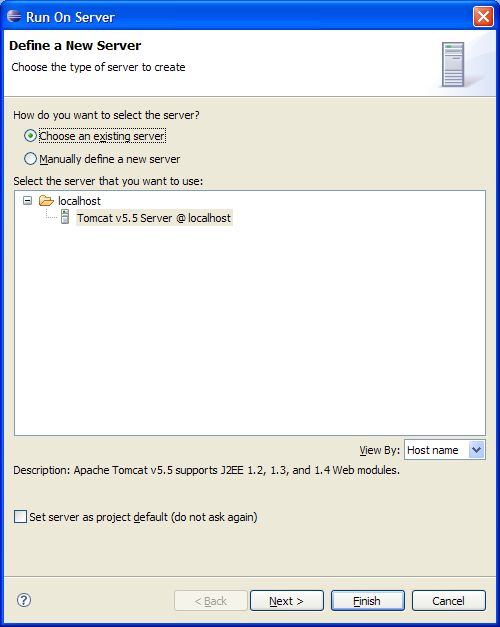
    tutorialdebugging11.png

    Make sure that the Tomcat server you configured is selected and click Finish. Eclipse then starts Tomcat and launches a browser pointed to your web app.
    tutorialdebugging12.png

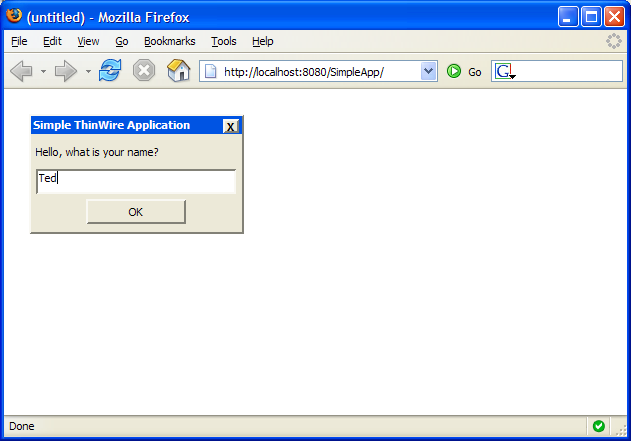
    We have a Dialog with a Label, TextField, and Button. You can drag the Dialog around the screen if you like. Type your name in the TextField and click the Button.
    tutorialdebugging13.png

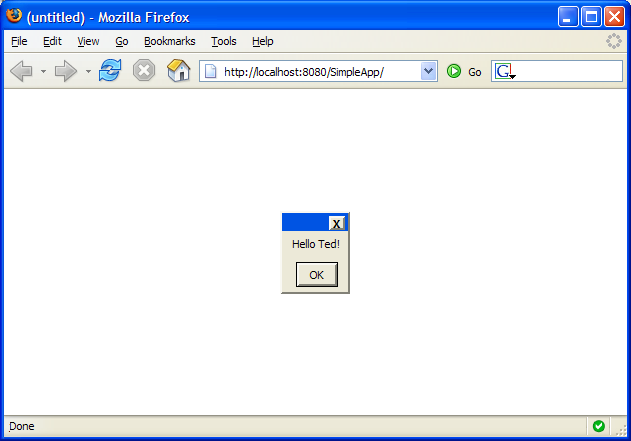
    The MessageBox component functions like a JavaScript alert (although you can do more with a MessageBox such as include an image, display multiple buttons, and include any ThinWire component). When you click OK, the MessageBox closes and the app is done. Back in Eclipse, right-click on the Tomcat Server and choose Stop.

    Debug the Application

    This is a very simple application, but in the case of more complex web applications, you may need some assistance in debugging your code. Since a ThinWire application is written in pure Java, we can fully utilize Eclipse’s built in debugger.

    In the code editor pane, find the first line of code that executes in the main method, and double-click in the left margin. A blue dot appears in the margin indicating a break point has been inserted. Now, right click on SimpleApp in the Project Explorer and choose Debug as –> Debug on Server. Click finish. Again Tomcat starts and the browser is launched. This time, Eclipse comes back into focus in the debug perspective. You may now step through the execution of your app as you watch the variables change.

    tutorialdebugging14.png

    When you’re done debugging, close your browser and stop the server.

    Export the Application as a WAR archive

    There’s only one more thing left to do: deploy the application. Eclipse WDP makes this extremely easy. Just right-click on SimpleApp in the Project Explorer and choose Export –> WAR file.

    tutorialdebugging15.png

    Choose a name for your WAR file and Eclipse will create the archive ready to be deployed onto any Java Servlet Container.

    This is just one method for creating ThinWire Rich Internet Applications. We took advantage of several advanced features of the Eclipse Web Tools Project, but really the only things a developer needs to create a ThinWire application are the ThinWire library JAR files, a Java complier, and a text editor. The only thing you need to run a ThinWire application is a Java servlet container. With ThinWire, creating Rich Internet Applications are as simple as creating desktop GUI applications.

    → 2:08 PM, Aug 23
  • RSS
  • JSON Feed